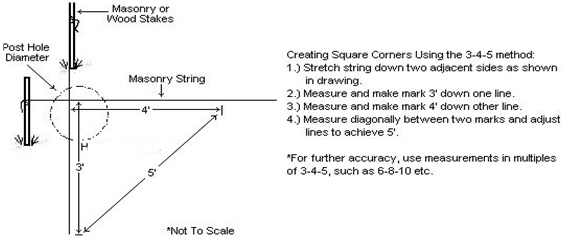
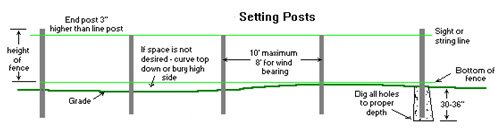
Three-Four-Five Triangulation Method to Squaring Corners:
WIRE DIAMETERS
1.9mm
2mm
2.1mm
2.2mm
2.3mm
2.4mm
2.5mm
2.6mm
2.7mm
2.8mm
2.9mm
3mm
3.1mm
3.2mm
M
E
S
H
S
I
Z
E
85*85mm
550gr
609gr
671gr
737gr
805gr
877gr
951gr
1029gr
1109gr
1193gr
1280gr
1370gr
1463gr
1559gr
80*80mm
581gr
647gr
713gr
783gr
856gr
932gr
1011gr
1093gr
1179gr
1268gr
1360gr
1456gr
1555gr
1656gr
75*75mm
623gr
690gr
761gr
835gr
913gr
994gr
1078gr
1166gr
1258gr
1353gr
1451gr
1553gr
1658gr
1767gr
70*70mm
667gr
739gr
815gr
895gr
978gr
1065gr
1155gr
1250gr
1348gr
1449gr
1555gr
1664gr
1776gr
1893gr
65*65mm
719gr
796gr
878gr
964gr
1053gr
1147gr
1244gr
1346gr
1451gr
1561gr
1674gr
1792gr
1913gr
2038gr
60*60mm
779gr
863gr
951gr
1044gr
1141gr
1242gr
1348gr
1456gr
1572gr
1691gr
1841gr
1941gr
2073gr
2208gr
55*55mm
849gr
941gr
1038gr
1139gr
1245gr
1355gr
1470gr
1590gr
1715gr
1845gr
1979gr
2117gr
2261gr
2409gr
50*50mm
934gr
1035gr
1141gr
1253gr
1369gr
1490gr
1618gr
1749gr
1887gr
2029gr
2177gr
2329gr
2487gr
2650gr
45*45mm
1038gr
1150gr
1268gr
1329gr
1522gr
1656gr
1797gr
1944gr
2096gr
2254gr
2418gr
2588gr
2763gr
2977gr
40*40mm
1168gr
1294gr
1427gr
1566gr
1711gr
1863gr
2022gr
2186gr
2358gr
2536gr
2721gr
2912gr
3109gr
3313gr
Weight of 1sqm Chain Link Fence with Galvanized Steel Wire
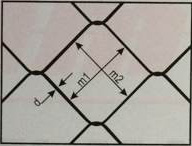
d=Wire diametre (mm)
m=Mesh size (mm),m=(m1+m2)/2
k=Weight of 1sqm chain link fence with galvanized steel wire (gr)
k=d²×12940/m
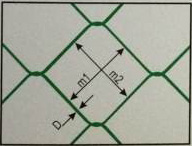
Weight of 1sqm Chain Link Fence with PVC Coated Steel Wire
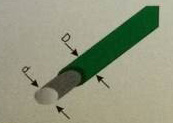
d=Inside diameter of wire (mm) (stell wire diameter)
D=Outside diameter of wire (mm) (PVC coated wire diameter)
m=Mesh Size (mm),m=(m1+m2)/2
kp=weight of 1sqm chain link fence with PVC coated wire (gr)
(Specific gravity of PVC;1.28gricm)
Kp=(10850d²+2090D²)/m
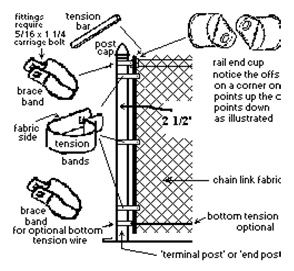
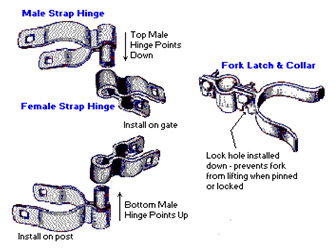
1. Place tension bands on end and corner posts. 2. Quantity of tension bands per hook-up = height of fence minus one; minimum of three. For example, a 4' high chain link fence requires 3 tension bands per hook-up. 3. A hook-up is each connection of chain link to an end or corner post. End posts have one hook-up; corner posts have two hook-ups. 4. Place one brace band on first to use if bottom tension wire will be installed. This fitting requires one bolt and nut. Install nut and bolt loosely. 5. Next, install tension bands. The tension bands are offset. The offset (flat side) faces 'out', the same side as the chain link fabric will be installed. This is normally the outside of the enclosed area. Do not install nuts and bolts on these. 6. Place one brace band per hook-up over the tension bands . This fitting requires one rail end cup, one bolt and nut. This band and cup will be used for the top rail. Tighten with a ratchet and socket. 7. The rail end cup is offset also. This offset can be up or down on an end post. Regardless of if you choose to position the cup up or down, be consistent. On a corner, since two sets of brace bands and rail end cups must share the same space, the bottom rail end cup is to be offset up and the bottom rail end cup is to be offset down. This enables the two cups to be level to each other, so your top rail can be inserted into the cups and be level to each other. 8. Typically all nuts are kept on the inside of the fence; this prevents someone on the outside from removing the nuts easily. 9. Place caps on posts. The end and corner post caps are simple. There is only one way to install them. The loop caps, as they are called, are offset, if you look at them carefully. The offset side faces the outside of the enclosure; the same side as the chain link will be installed.